Back Corner Edition
First, I need to thank Pinterest for my ridiculous obsession with sprucing up my room. I'm not usually one to have lots of things on the walls...until Pinterest came along.
Oh, Pinterest, how you inspire me.
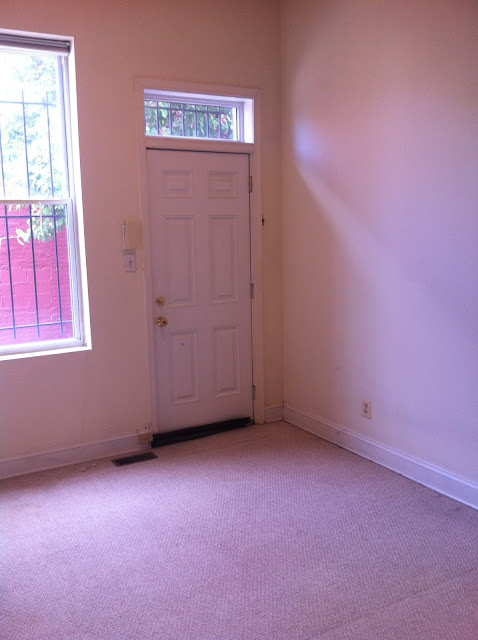
This is how I came to choose my height of curtains for my back wall. Which is difficult since my ceilings are 12' high. And the window? The top of it is at 9'. Yeah. It's tall. Not to mention, I have this ugly door. It's my fire escape. Which is highly complicated for an escape seeing as on the other side, I have an iron bar door which I have to unlock with a key. And then once that's open? I have to choose to jump down 10 feet into the basement apartment entrance or step onto the iron bar door and swing over to the fence and shimmy down like Spider Man. But I digress. It's an ugly door.
 |
| Yeah. Like I said. U-G-L-Y. |
Once I had my curtain fabric picked out, I went to the "gallery space" above my bed. I already had some random canvases from wanting to be artsy fartsy, a mirror I got on the cheap, and a picture I got from Eastern Market that was the progression of a cherry tree about the Tidal Basin with the Thomas Jefferson Memorial in the background.
 |
| Cheap poster frame for the pics? OK! And you'll see the Colorado Gray is blue. |
From my Artsy Fartsy board, I hybridized these two pins:
Enter: The Fabric Flower Mod Podged Wall Art.
Assemble your goods:
Canvas
Fabric
Mod Podge
Sponge brush
Here's I Frankensteined my way through this project:
- Instead of using math or a string, I outlined glass bowls I had to choose the size of the circles to draw on the canvases.
- Again without using math, I traced circles onto fabric that were about 3" and 2" in diameter. Pro tip: If you fold your fabric, you can cut out more than one circle at a time. I cut about 30 each of the two sizes total for my three fabric choices (leftover from my curtains...see how I did that?)
- Cut all those circles in half. Boom. Doubled your petal count.
- From there, I lined up the edge of the 3" gray fabric along the circle outline (sorry I didn't take pics because my hands were a little glue-y.)
- By applying Mod Podge to the backside of the fabric, it's like gluing paper down. Pro tip: apply a layer of Mod Podge directly to the canvas to make sticking easier.
- Once I completed the circle, I went over top of the pieces with Mod Podge because I knew that I would be irritated as hell if even one petal started to wilt.
- The next layer, I used the 3" purple and offset those petals from the gray by half.
- I continued with the white fabric and offset it from the purple.
- I then used another round of the 3" circles in all three colors.
- Switch to your small cirlces and continue to fill in the circle.
- Once you're to the middle and a small circle fits nicely in the center, spackle that sucker down. Pro tip: Don't be afraid of Mod Podge. It dries clear.
- Repeat on other circles.
- Since the Mod Podge will create a subtle sheen on the canvas, I did one thin layer over the whole canvas to keep the appearance uniform once they were hung on the wall.
 |
| Boom. Hybrid pins. |
To finish up my wall, I slapped some purple paint on the frame of that cheapo mirror to add another pop of color.
Now onto the part of the post that you really care about: the AFTER photos!
 |
| Tall curtains? Check. Wall collage? Check. |
 |
| Lighting is not great because I also realized my overhead light is not centered. |
 |
| BOOM! Big reveal! |
 |
| BAM! Look at the difference! |
 |
| Buh-bye ugly door! (But not forever in case I was in need of escape from an inferno...but that's beside the point.) |


DUDE!!! This is amazing! Seriously! Love the idea w/the curtains!
ReplyDeleteYou did not get this talent from your mother. Nicely done.
ReplyDelete